Page: 1
/
8
Total 36 questions
Ace Oracle Cloud Infrastructure 2025 Security Professional 1Z0-1104-25: Your Gateway to Cloud Excellence
Question 1
SIMULATION
Challenge 2 -Task 1
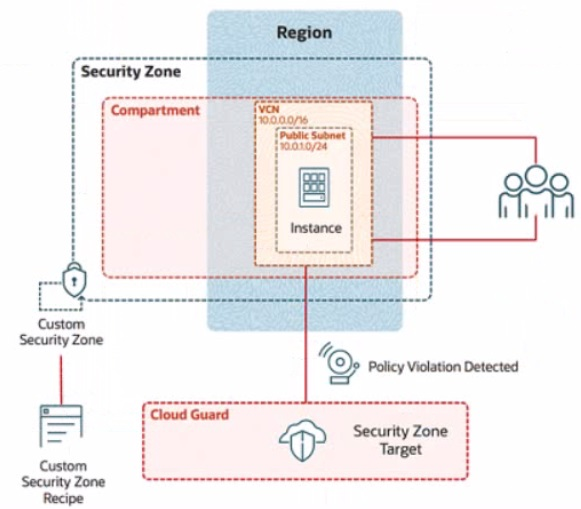
In deploying a new application, a cloud customer needs to reflect different security postures. If a security zone is enabled with the Maximum Security Zone recipe, the customer will be unable to create or update a resource in the security zone if the action violates the attached Maximum Security Zone policy.
As an application requirement, the customer requires a compute instance in the public subnet. You therefore, need to configure Custom Security Zones that allow the creation of compute instances in the public subnet.
Review the architecture diagram, which outlines the resoures you'll need to address the requirement:
Preconfigured
To complete this requirement, you are provided with the following:
Access to an OCI tenancy, an assigned compartment, and OCI credentials
Required IAM policies
Task 1: Create a Custom Security Zone Recipe
Create a Custom Security Zone Recipe named IAD-SP-PBT-CSP-01 that allows the provisioning of compute instances in the public subnet.
Enter the OCID of the created custom security zone recipe in the text box below.
Correct : A
To create a Custom Security Zone Recipe named IAD-SP-PBT-CSP-01 that allows the provisioning of compute instances in a public subnet, we will follow the steps outlined in the Oracle Cloud Infrastructure (OCI) Security Zones documentation. These steps are based on verified procedures from the OCI Security Zone Guide and related resources.
Step-by-Step Solution for Task 1: Create a Custom Security Zone Recipe
Log in to the OCI Console:
Ensure you have access to the assigned compartment provided in the tenancy.
Navigate to Security Zones:
From the OCI Console, go to the navigation menu (hamburger icon) on the top left.
Under Governance and Administration, select Security Zones.
Create a New Security Zone Recipe:
In the Security Zones dashboard, click on the Recipes tab.
Click the Create Recipe button.
Configure the Recipe Details:
Name: Enter IAD-SP-PBT-CSP-01.
Description: (Optional) Add a description, e.g., 'Custom recipe to allow compute instances in public subnet.'
Leave the Compartment as the assigned compartment provided.
Define the Security Zone Policy:
In the policy editor, start with a base policy. Since the Maximum Security Zone recipe restricts public subnet usage, you need to customize it.
Add the following policy statement to allow compute instances in a public subnet:
Allow service compute to use virtual-network-family in compartment <compartment-name> where ALL {
target.resource.type = 'Instance',
target.vcn.cidr_block = '10.0.0.0/16',
target.subnet.cidr_block = '10.0.10.0/24'
}
Replace <compartment-name> with the name of your assigned compartment.
This policy allows the Compute service to provision instances in the public subnet (10.0.10.0/24) within the VCN (10.0.0.0/16).
Adjust Restrictions:
Ensure the recipe does not inherit the Maximum Security Zone recipe's default restrictions that block public subnet usage. Explicitly allow the public subnet by including the subnet CIDR block (10.0.10.0/24) in the policy.
Remove or modify any conflicting default rules that prohibit public subnet usage (e.g., rules blocking internet access or public IP assignment).
Save the Recipe:
Click Create to save the custom security zone recipe.
Once created, note the OCID of the recipe from the recipe details page. The OCID will be a unique identifier starting with ocid1.securityzonerecipe.
Verify the Recipe:
Go to the Recipes tab and locate IAD-SP-PBT-CSP-01.
Ensure the policy reflects the allowance for compute instances in the public subnet by reviewing the policy statement.
OCID of the Created Custom Security Zone Recipe
The exact OCID will be generated upon creation (e.g., ocid1.securityzonerecipe.oc1..unique_string). Please enter the OCID displayed in the OCI Console after completing Step 7.
Notes
Ensure IAM policies are correctly configured to grant you permissions to create and manage security zone recipes in the compartment.
The policy assumes the public subnet CIDR (10.0.10.0/24) matches the diagram. Adjust if the actual subnet CIDR differs.
Test the recipe by associating it with a security zone and attempting to launch a compute instance to confirm compliance.
Start a Discussions
Submit Your Answer:
Question 2
SIMULATION
Task 2: Create a Compute Instance and Install the Web Server
Create a compute instance, where:
Name: PBT-CERT-VM-01
Image: Oracle Linux 8
Shape: VM.Standard.A1.Flex
Subnet: Compute-Subnet-PBT-CERT
Install and configure Apache web server:
a.
Install Apache
sudo yum -y install httpd
b.
Enable and start Apache
sudo systemctl enable httpd
sudo systemctl restart httpd
2. Install and configure Apache web server:
a. Install Apache
sudo yum -y install httpd
b. Enable and start Apache
sudo systemctl enable httpd
sudo systemctl restart httpd
c. Configure firewall to allow HTTP traffic (port 80)
sudo firewall-cmd --permanent --add-port=80/tcp
sudo firewall-cmd --reload
d. Create an index.html file
sudo bash -c 'echo You are visiting Web Server 1 >> /var/www/html/index.html'
Enter the OCID of the created compute instance PBT-CERT-VM-01 in the text box below.
Correct : A
Task 2: Create a Compute Instance and Install the Web Server
Step 1: Create the Compute Instance
Log in to the OCI Console.
Navigate to Compute > Instances.
Click Create Instance.
Enter the following details:
Name: PBT-CERT-VM-01
Compartment: Select your assigned compartment.
Placement: Leave as default or select an availability domain (e.g., Availability Domain 1).
Image: Click Change Image, select Oracle Linux 8, and confirm.
Shape: Click Change Shape, select VM.Standard.A1.Flex, and configure:
OCPUs: 1 (or adjust as needed)
Memory: 6 GB (or adjust as needed)
Networking:
Virtual Cloud Network: Select PBT-CERT-VCN-01.
Subnet: Select Compute-Subnet-PBT-CERT.
Leave public IP assignment enabled for internet access.
SSH Key: Provide your public SSH key (upload or paste) for secure access.
Click Create and wait for the instance to be provisioned.
Step 2: Connect to the Compute Instance
Once the instance is created, note the Public IP Address from the instance details page.
Use an SSH client to connect:
Command: ssh -i
Replace
Step 3: Install and Configure Apache Web Server
Install Apache:
Run: sudo yum -y install httpd
Enable and Start Apache:
Run: sudo systemctl enable httpd
Run: sudo systemctl restart httpd
Configure Firewall to Allow HTTP Traffic (Port 80):
Run: sudo firewall-cmd --permanent --add-port=80/tcp
Run: sudo firewall-cmd --reload
Create an index.html File:
Run: sudo bash -c 'echo 'You are visiting Web Server 1' >> /var/www/html/index.html'
Step 4: Verify the Configuration
Open a web browser and enter http://
If needed, troubleshoot by checking Apache status: sudo systemctl status httpd.
Step 5: Retrieve and Enter the OCID
Go to the instance details page for PBT-CERT-VM-01 under Compute > Instances.
Copy the OCID (a long string starting with ocid1.instance., unique to your tenancy).
Enter the copied OCID exactly as it appears into the text box provided.
Notes
These steps are based on OCI Compute documentation and Oracle Linux 8 setup guides.
Ensure the security list PBT-CERT-CS-SL-01 allows inbound traffic on port 22 (SSH) and port 80 (HTTP) if not already configured.
The OCID will be unique to your instance; obtain it from the OCI Console after creation
Start a Discussions
Submit Your Answer:
Question 3
You're managing an Oracle Cloud Infrastructure (OCI) environment where a public website hosts downloadable assets stored in Object Storage buckets. These buckets need to be publicly accessible for website visitors, but Cloud Guard keeps flagging them as security risks.
How can Cloud Guard be configured to ignore problems specific to public buckets while still ensuring security checks are applied to other resources that require them?
Correct : D
Start a Discussions
Submit Your Answer:
Question 4
Which are the essential components to create a rule for the Oracle Cloud Infrastructure (OCI) Events Service?
Correct : C
Start a Discussions
Submit Your Answer:
Question 5
Within OCI IAM identity domains, the AD Bridge component serves a critical role. How does the AD Bridge functionality specifically enhance Identity and Access Management (IAM) practices?
Correct : A
Start a Discussions
Submit Your Answer:
Want to Unlock Everything for
Oracle 1Z0-1104-25 Exam?
Oracle 1Z0-1104-25 Exam?
By upgrading to Premium Access, you’ll instantly unlock:
Unlock 36 Premium Questions
- Exam Name: Oracle Cloud Infrastructure 2025 Security Professional
- Exam Code: 1Z0-1104-25
- Last Update: 16-Jul-2026
- Formats: PDF, Web-based,
Desktop Practice - 24/7 Customer Support
 Price: $59 (PDF Format)